
The box has arrived. Inside, gleaming under your kitchen lights, sits the promise of a perfect morning: a brushed stainless-steel espresso machine, your personal gateway to café-quality coffee. You see the hefty portafilter, the bag of artisanal beans on the counter, and you can almost taste the rich, complex shot of espresso or the velvety latte you’re about to create. This is the dream.
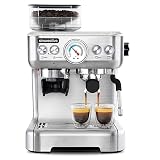
Then comes the reality. After the initial thrill of unboxing a machine like the Sincreative CM5700, a quiet sense of intimidation can creep in. There are dials, a pressure gauge that seems to have a mind of its own, and a steam wand that hisses like a tiny dragon. Your first attempt might yield a fast, watery shot that tastes sour. This moment, this gap between the dream and the reality, is what we call the “learning curve.” But here’s the secret: that curve isn’t a flaw in the machine or a failing on your part. It is the journey. This guide is here to walk you through that journey, step by step. We’ll use this all-in-one machine as our classroom, transforming you from a hopeful button-pusher into a confident home barista who understands the craft.

The Heart of Great Espresso: Taming the ‘Extraction Trinity’
Before we touch a single button, let’s establish the fundamental truth of espresso: it is an act of balance. A perfect shot is not the result of an expensive machine, but the mastery of three interconnected elements, a concept we’ll call the “Extraction Trinity.” It’s the delicate dance between the grind, the dose, and the tamp. Get this trinity right, and you’ve unlocked 90% of what it takes to make exceptional espresso.
The Grind: Your Flavor Dial
Inside your machine is a conical burr grinder, a tool of precision that shatters beans into uniform particles, unlike a blade grinder which merely hacks them to bits. This uniformity is crucial for an even extraction. The CM5700 offers 15 grind settings, which can seem daunting. Think of this not as a test, but as your primary flavor dial. A good starting point, as often suggested, is a setting around 6-8. If your espresso tastes sour and watery, the water is flowing through the coffee too quickly; you need to go finer. If it tastes bitter and burnt, it’s flowing too slowly; you need to go coarser. Make one small adjustment at a time, because this is the single most powerful variable you control.
The Dose: Fueling the Machine
The dose is simply the amount of ground coffee you put in your portafilter’s basket. Consistency here is key. While you can eyeball it, a small kitchen scale is a home barista’s best friend. For a rich, full-bodied double espresso, aim for a dose between 18-21 grams. Too little coffee, and the water will rush through, leading to a weak shot regardless of your grind. Too much, and you might choke the machine or be unable to lock the portafilter. Weighing your beans before you grind ensures you are starting with the same amount of fuel every single time, eliminating a major variable and making your adjustments to the grind far more meaningful.
The Tamp: The Art of Consistent Pressure
Tamping is the act of compressing the coffee grounds into a dense, level puck. The goal here isn’t to exert superhuman strength; it’s to create a uniform bed of coffee that will resist the pressurized water evenly. A sloppy, uneven tamp will create “channels”—pathways of least resistance for the water to rush through, leaving other parts of the coffee under-extracted. Focus on keeping the tamper perfectly level and applying firm, consistent pressure until the coffee feels solid. It’s more about finesse than force.

The Pressure Puzzle: Why the Gauge Isn’t Moving (And How to Fix It)
You’ve carefully prepared your trinity. You lock in the portafilter, press the button, and… the pressure gauge barely flickers. The espresso gushes out in a pale, rapid stream. Before you feel a wave of frustration, know this: you’ve just met the most important teacher on your espresso journey. The pressure gauge isn’t a measure of the machine’s power; it’s a measure of the resistance the water is encountering in that puck of coffee. If there’s no pressure, there’s not enough resistance.
Let’s solve this puzzle together with a systematic troubleshooting process. If your shot runs too fast and the pressure is low, work through these steps in order:
- Go Finer on the Grind. This is the answer 90% of the time. The most common mistake is having a grind that is too coarse. The water is simply finding it too easy to pass through. Adjust your grinder one notch finer and try again.
- Increase Your Dose. If you’re still not building enough pressure, ensure you are using enough coffee. Are you in that 18-21 gram range? A slightly larger dose will create a thicker puck, offering more resistance.
- Evaluate Your Tamp. While less impactful than grind or dose, an extremely light tamp might contribute to low pressure. Ensure you are applying firm, consistent pressure.
This process of adjustment is known as “dialing in.” It’s not a sign that something is wrong; it is the fundamental ritual of making espresso. Every new bag of beans will require this dance. To simplify the process, try to only change one variable at a time. Keep your dose and tamp consistent, and focus solely on adjusting the grind until you get it right. Embrace the ritual, and you’ll begin to understand the language of your coffee.
The Magic of Milk: From Liquid to Silky Microfoam
With your espresso now flowing like dark honey, crowned with a rich, reddish-brown crema, you’ve conquered the core of the craft. But for many, the journey isn’t complete without a cloud of perfectly steamed milk. This is where we move from barista to artist. The goal is to create “microfoam”—a silky, paint-like texture that integrates with the espresso, not the stiff, bubbly froth that sits on top like a hat.
The secret lies in both technique and science. For the best results, start with very cold, whole milk. The fats and proteins in whole milk are crucial for creating a stable, velvety foam. Low-fat or warm milk is much harder to work with.
Here is a simple, repeatable process for using the powerful steam wand on your machine:
- Purge: Before inserting the wand into your milk, point it into the drip tray and open the steam valve for a couple of seconds. This clears out any condensed water.
- Position: Submerge the tip of the steam wand just below the surface of the milk in your pitcher, holding it at a slight angle to the side.
- Stretch (Aerate): Open the steam valve fully. You should hear a gentle “tss-tss-tss” sound, like paper tearing. This is air being introduced into the milk. Let this happen for only a few seconds—just long enough for the milk to expand by about 20-30%.
- Spin (Texturize): Raise the pitcher slightly to submerge the wand deeper into the milk. This stops the aeration. Now, focus on creating a vortex or whirlpool. This spinning motion breaks down large bubbles and textures the milk into that silky microfoam. Continue until the pitcher is hot to the touch (but not so hot you can’t hold it for a second).
- Finish: Immediately turn off the steam, wipe the wand with a damp cloth, and give it one final purge to keep it clean. Tap the pitcher on the counter to pop any large bubbles and swirl the milk to keep it glossy and integrated.

Your First Masterpiece and the Road Ahead
Now, pour that beautifully textured milk into your perfectly extracted espresso. Watch as it forms a heart, a rosetta, or just a beautiful, unified beverage. Take a sip. That is the taste of your journey, of a skill you have learned and a machine you have mastered.
The Sincreative CM5700, like any capable semi-automatic machine, isn’t a vending machine. It’s an instrument. It provides you with the tools—a precision grinder, powerful pressure, and a capable steam wand—but it asks for your participation. It invites you onto a path of discovery. So, embrace the process of dialing in. Experiment with different beans. Perfect your milk texture. The best cup of coffee isn’t one you buy; it’s the one you understand, the one you craft with your own hands, right in your own kitchen. The journey has just begun.